

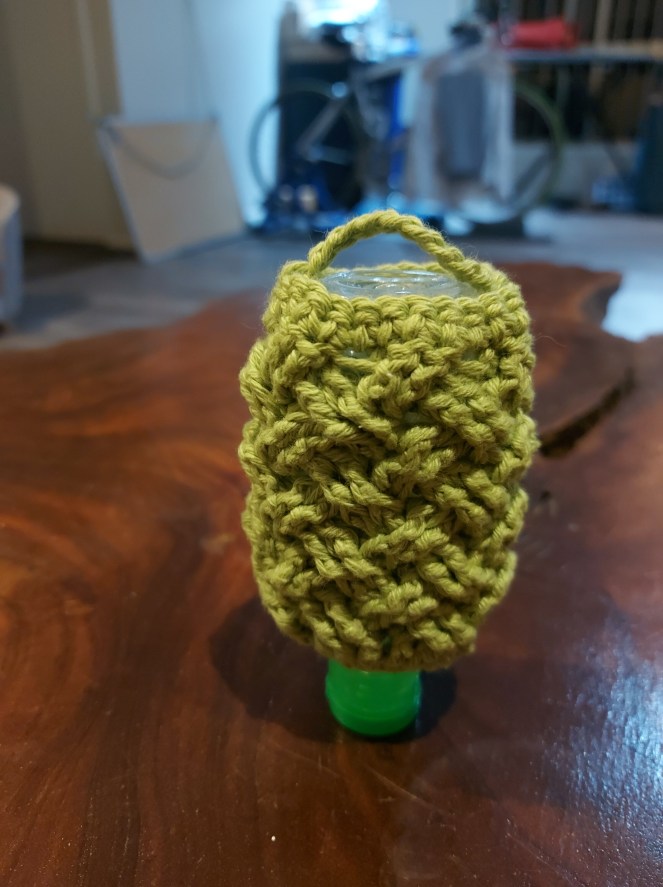
With the world returning to a state of “normalcy” after COVID-19 there are certain changes that will be sticking around. For example the consistent use of hand sanitiser on pubic transport has become essential for commuters, especially those in the high risk categories like myself. Easy access to hand sanitiser without digging through (and potentially contaminating!) my bag is important. To solve this I have developed this easy clip on hand sanitiser pouch. The pattern has just been released on my Ravelry page and you can buy an add free pattern for the frog version here. To celebrate the release I am sharing the base of the pattern for free on my blog. The add free pattern is included in the Frog Hand Sanitiser Cozie For just $2.5! It also includes an ad-free PDF of each pattern and tailoring instructions.

After finishing the frog cozie, I started to experiment with different stitches and patterns. So in this updated post I have added three patterns. Now there is a plain cozie, striped cozie, mesh cozie, pineapple stitch cozie and Celtic Stitch cozie. These are available in a patter book on my ravelry account.

What you will need
- 20-25m 8 ply cotton for a plain cozie. I used Lincraft 8 Ply cotton.
- 35-40 m 4 ply cotton for pineapple, mesh and striped cozie. I used Mondal Cotton Soft Bio and tootgarook by Bella Baby.
- 30-35m 8 ply cotton for Celtic stitch. I used Lincraft 8 Ply cotton.
- 3.5mm hook or 2.5mm hook.
- Carribena or split ring
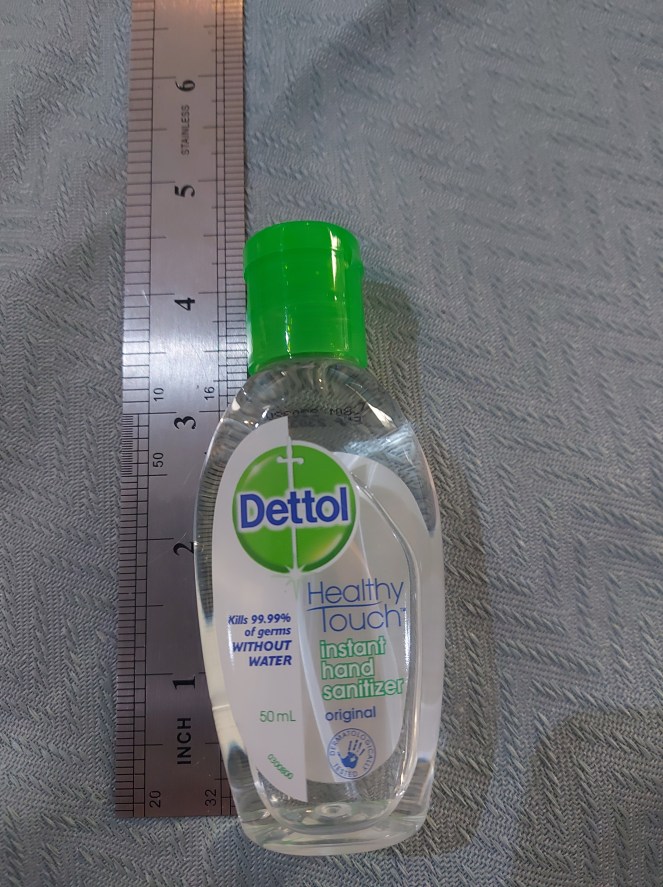
- Dettol 50ml hand sanitizer or similar bottle. Bottle measurements are given below to assist with scaling

These patterns are written in US terminology. You will need to be familiar with chains (CH), single crochet (SC), double crochet (DC), Treble Crochet (TC) and slip stitch (SL). You also want to be familiar with Cetic stitch.
We are going to start off with the easy patterns and work to the most difficult patterns. More of a photo tutorial is given on pattern book the PDF on my Ravelry page.
The Plain Pattern
Starting off with something easy. To scale reduce the number of rows in the cozie. A purell bottle may only need 14 rows.
This pattern needs 25-30m 8 Ply cotton (I used Lincraft 8 Ply Cotton) and a 3.5mm hook.
- Foundation: CH14, SL into first chain, CH1.
- R1: SC20 into the foundation ring, SL into first SC, CH1.[20]
- R2: SC9, 2SC into the next stitch, SC9, 2SC into last stitch, SL into the first SC, CH1. [22]
- R3-17: SC around, SL into first SC.
- R18: Top loop, CH11, SL into the 11th stitch of R17. Fasten off and weave in end.
This pattern can be embellished with any applique. Golden Lucy Crafts has a range of free patterns for you to look at. Remember to share pictures of the the finished product in the frog version that could be yours!


The next two patterns need a 3.5mm hook and a fingering weight 4ply cotton. I used Mondal Cotton Soft Bio.
Mesh Body:
- Foundation: CH14, sL into first chain, CH1.
- R1: SC25 into the foundation ring, SL into first SC, CH1.[25]
- R2: SC in each stitch around. [25]
- R3: CH4, DC in same stitch, SK2, {DC, CH1, DC in same stitch, SK2} around until one stitch left SK1. SL into the third chain stitch.
- R4-11: SL into the CH1 space. CH4 DC in same stitch,{ in the next CH1 space, DC, CH1, DC in same stitch} SL into the third chain stitch made at the start. If your bottle is taller, repeat this row until desired height.
A Purell bottle will only need to continue up to R7. - R12: SL into the CH1 space, 3SC into each CH1 space around
V-Stripe Body:
- Foundation: CH14, sL into first chain, CH1.
- R1: SC20 into the foundation ring, SL into first SC, CH1.[20]
- R2: SC9, 2SC into the next stitch, SC9, 2SC into last stitch, SL into the first SC, CH1. [22]
- R3-8: SC around, SL into first SC. Reduce the number of repeats here to 1/3 bottle height for a shorter bottle.
- R9: CH4, DC in same stitch, SK1, {DC, CH1, DC in same stitch, SK1} around. SL into the third chain stitch.
- R10: SL into the CH1 space. CH4 DC in same stitch,{ in the next CH1 space, DC, CH1, DC in same stitch} SL into the third chain stitch made at the start.
- R11: SL into the CH1 space, 2SC into each CH1 space around, SL into first SC. [22SC]
- R12-17: CH1, SC around, SL into first SC. Reduce or increase the number of repeats here to match your bottle.
- R18: Top loop, CH11, SL into the 11th stitch of R17. Fasten off and weave in ends.

Pineapple Stitch Cozie
The pineapple stitch cozie needs Tootgarook Cotton 4ply and a 2.5mm hook.
- Foundation: CH20 join
- R1: make 28SC into the CH20 ring, SL
- R2:CH4 (counts as DC+CH1), DC in same stitch. CH3, SK4, SC in 5th stitch, CH5, SK4 SC in 5th stitch, CH3, SK4, 2DC in same stitch (5th stitch), CH1, 2DC in same stitch (as previous 2DC), CH3, SK4, SC in 5th stitch, CH5, SK4 SC in 5th stitch, CH3, DCinto the base of the CH4 from the start of the round. SL into the 3rd chain..
- R3:SL into CH1 space, CH3, DC in same space, CH1, 2DC in same space, SK the CH3 space of R2. Make 11 TC in the CH5 space of R2. SK the CH3 space to the next CH1 space of R2 (between the two DC), 2DC CH1 2DC into the CH1 space.SK the CH3 space of R2. Make 11 TC in the CH5 space of R2. SL into the third chain at the start of the row. SL into top of the next DC, SL into the CH1 space.
- R4: CH3, DC in same space, CH1, 2DC in same space, CH2, SC int first TC of R3. {CH3, SK1, SC] Repeat 5 times. CH2, SK 2 (up to the CH1 space in R3), 2DC CH1 2DC into the CH1 space CH2, SC into first TC of R3. {CH3, SK1, SC] Repeat 5 times CH2, SL into the third chain from the start of the row. SL into top of the next DC, SL into the CH1 space.
- R5: CH3, DC in same space, CH1, 2DC in same space, CH3, SC into the first CH3 space of R4. {CH3, SK1, SC] Repeat 4 times in total. CH3, SK 2 (up to the CH1 space in R3), 2DC CH1 2DC into the CH1 space CH3, SC into the next CH3 space of R4. {CH3, SK1, SC] Repeat 4 times in total CH3, SL into the third chain from the start of the row. SL into top of the next DC, SL into the CH1 space.
- R6: CH3, DC in same space, CH1, 2DC in same space, CH4, SC into the first CH3 space of R5. {CH3, SK1, SC] Repeat 3 times in total. CH4, SK 2 (up to the CH1 space in R3), 2DC CH1 2DC into the CH1 space CH4, SC into the next CH3 space of R5. {CH3, SK1, SC] Repeat 3 times in total CH4, SL into the third chain from the start of the row. SL into top of the next DC, SL into the CH1 space.
- R7: CH3, DC in same space, CH1, 2DC in same space, CH5, SC into the first CH3 space of R6. {CH3, SK1, SC] Repeat 2 times in total. CH5, SK 2 (up to the CH1 space in R3), 2DC CH1 2DC into the CH1 space CH5,SC into the next CH3 space of R6. {CH3, SK1, SC] Repeat 2 times in total CH5, SL into the third chain from the start of the row. SL into top of the next DC, SL into the CH1 space.
- R8: CH3, DC in same space, CH1, 2DC in same space, CH7, SC into the first CH3 space of R6. CH3, SK1, SC. CH7, SK 2 (up to the CH1 space in R3), 2DC CH1 2DC into the CH1 space CH7, SC into the next CH3 space of R6. CH3, SK1, SC, CH7, SL into the third chain from the start of the row. SL into top of the next DC, SL into the CH1 space.
- R9:CH3, DC in same space, CH1, 2DC in same space, CH2 SK 2 CH from R8. SC in 3rd along. CH5, SK 15. You should be 3 stitches from the next DC cluster. SC in that stitch, CH2, SK4 (up to the CH1 space), 2DC, CH1, 2DC in same space, CH2 SK 2 CH from R8. SC in 3rd along. CH5, SK 15. You should be 3 stitches from the starting DC cluster. SC, CH2, SL into the third chain made at the start.
- R10. SC into the same stitch you just made the SL into. SC in next stitch, SC in CH1 space, SC into the next two DC, 2SC into the CH2 space, SC into the next stitch, 5 SC into the SC 5 space , SC, 2SC into the CH2 space, SC into the next two DC, SC in the CH1 space, SC into the next two DC,2SC into the CH2 space, SC into the next stitch, 5 SC into the SC 5 space , SC, 2SC into the CH2 space, SL into the first SC of this round.
For a smaller bottle stop here.and skip to R12.
For a larger bottle continue to R11. - R11. CH1, SC into same stitch, 5 SC, SCDEC, 5SC, SCDEC, 6SC, SCDEC, 5SC, SCDEC, SC, SL.
If desired add repetitions of R13 until you reach the desired height. You can skip to R14 here. - R13: CH1, SC around, SL into the first SC.
- R14: SL, SL, CH12, SK 12, SL. Fasten off and weave in ends.

The pattern is based off this stitch diagram, with minor modifications to work in a round not a swatch.

Celtic Stitch Cozie
The celtic stitch cozie needs 35-40m of 8 ply cotton. I used Lincraft Cotton 8 Ply. You need to be familiar with cetic stitch or working FPTC and BPTC stitches for this pattern. A great place to learn Celtic stitch is crochet it creations. They have done a lovley tutorial step by step photo tutorial. The ad-free PDF on Ravelry has some photos to guide, but not a full tutorial. This pattern varies from the swatch form of celtic stitch to let it be worked in a round.
- Foundation: CH14, SL into first chain, CH1.
- R1: SC24 into the foundation ring, SL into first SC, CH1.[24]
- R2: CH2, DC around. [24 DC]
- R3: CH3, SK 2, FPTC in next two stitches, FPTC around both skipped stitches this stitch will be on top of the first FPTC , working from the first skipped to second skipped stitch. It will form a small X. *SK2, FPTC in next two stitches, FPTC around both skipped stitches* Repeat from * to * around. SL into the CH3.
- R4: CH3 and Turn. you will work this row on the wrong side. The start of this row is a little messy. You will work with the first two stitches of the previous row and the last two stitches of the previous row. Beginning with the first two stitches of R3 BPTC around each. Working on the back side of the work (RS) BPTC around the last two stitches of round 3. <-This is the tricky part. *SK2, BPTC around next stitches, going behind the work BPTC around the skipped stitches* Repeat around frm * to *. SL into the CH3.
- R5: CH3 and Turn. You will work with the first two stitches of the previous row and the last two stitches of the previous row. Beginning with the last two stitches of R4, FPTC, crossing back over in front of the previous two stitches FPTC around the two skipped stitches. *SK 2, FPTC, crossing back over in front of the previous two stitches FPTC around the two skipped stitches. * Repeat from * to * around. SL into the CH3.
- R6-11:Repeat R4 and R5.
- R12: CH1, SC in each stitch around. SL into first SC.
- R13: CH12, SK 11 SL into the 12th stitch. Fasten off and weave in ends.
Thank you for reading the tutorial please remember to tag my Instagram and Facebook with photos of your finished projects. I would love to see the finished product.


Terms of use:
Free patterns found on this site can be used to make finished items for the following purposes:
- For personal use
- As gifts for friends/family
- For charity donations
- For sale online
- For sale at craft fairs, outdoor markets, etc.
When using the free patterns found on this site, please be aware of the following:
- You are allowed sell finished items from the patterns found here. However, you may NOT, under any circumstances, use the photos found on this site for selling your items. If you are going to sell online, you should make your own items and photograph them to represent your own work.
- You may NOT copy and paste the pattern onto your own blog, Facebook, or anywhere else. If you would like to share a pattern, simply share the link to the page instead. You are welcome to copy and paste a pattern into a document for printing or saving for personal use only.
- You may NOT use the free patterns found on this site as teaching material and/or for online classes without expressed written consent from the designer/owner of this page.
- You may NOT use the free patterns found on this site to create video tutorials on YouTube or any other video platform, site, or blog.
- You may NOT post a translation of the patterns found on this site anywhere without expressed written consent from the designer/owner of this page.
- You may NOT create PDFs of the patterns found on this site, altered or in its original form, for intent to distribute to others or post on illegal pattern sharing sites. The revenue earned by ad traffic to this site is what allows for free patterns to be written and published. Without people visiting this site to view the patterns, there will be no traffic which means, no more free patterns.
- You may NOT copy any of the free patterns on this site, in part or as a whole, and claim them as your own pattern.
- You may NOT resell the free patterns found on this site, altered or in its original form.
If you have any questions regarding the terms of use of this page, please contact the designer/site owner.
