
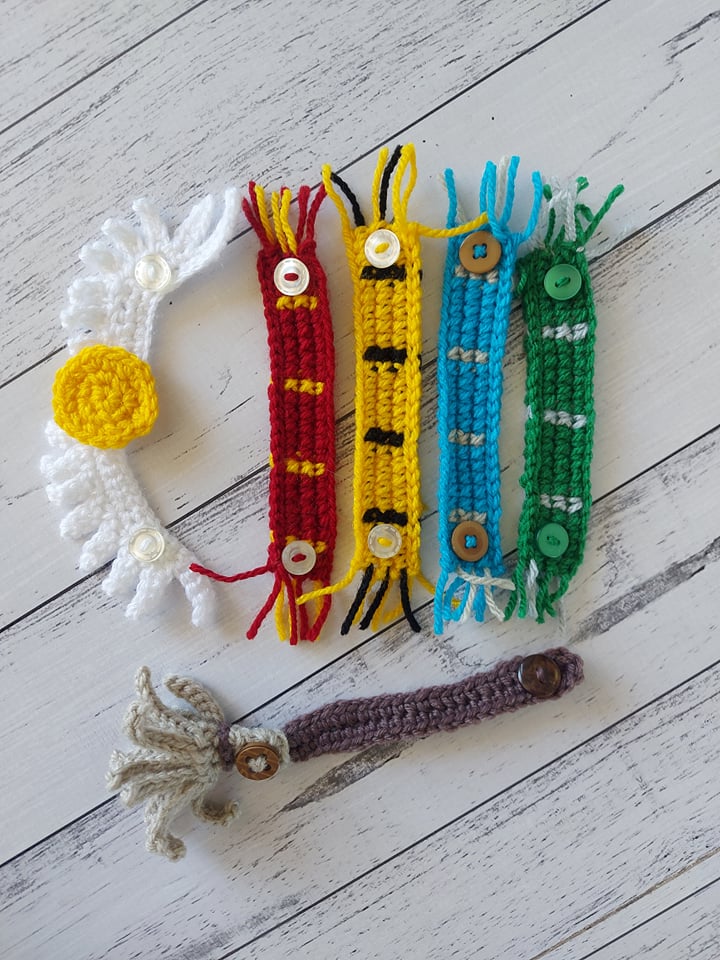
Its been a while since my last post, but I’ve been busily working away at my PhD and have finally finished my confirmation review- now the real work starts! I’ve been doing a few smaller study break style pattern designs and I am now pleased to announce my Harry Potter inspired ear saver range! There are 4 scarf variants, a golden snitch and a broom. You can get an ad-free version of the pattern on my ravelry store.
What you Need:
Yarn
| Ear Saver | Colour 1 (DK/8Ply) | Colour 2 (DK/8Ply) |
| Broom | Light Brown Approx 20m | Dark BrownApprox 2m. |
| Golden Snitch | YellowApprox. 5m | WhiteApprox. 20m |
| Scarf | Main Colour:Green/Red/Yellow/BlueApprox. 20m. | Contrasting Colour:Grey/Yellow/Black/Light BrownApprox. 5m. |
Notions:
- 2 Buttons for each ear saver
- Yarn Needle
- 3.5mm Hook
Stitches used
- Single Crochet – US terms given by SC
- Double Crochet – UK term given by DC
- Slip Stitch given by SL
- Chain given by CH
Golden Snitch:
Step 1: Make Ball, in a spiral.
R1: in a magic circle 6SC/DC, close loop. Mark end of round with a stitch marker. [6]
R2: 2SC in each stitch around. Mark end of round with a stitch marker.[12]
R3: *SC/DC, 2SC/DC in the same stitch* Repeat from * to * around. Slip stitch into the first stitch. [18]
Step 2: Make 2x Wings
Foundation: CH21
R1: in 2nd stitch from hook SL, 4SC/DC, SK, 14SC/DC, CH1 and turn. [19]
R2:14SC/DC, CH6 and turn.
R3: SL in 2nd chain from the hook, 4SC/DC, SL, [CH5, in 2nd chain from hook SL, 4SC/DC, SL into the next stitch along from round 2] Repeat a total of five times, CH4, SL in 2nd chain from hook, 2SC/DC, SL in the next stitch along from round 2, SC/DC in the remaining stitches. Fasten off and leave a long chain for weaving in.
Mirrored Wing- Optional right wing for the snitch.
CH21.
R1: in 2nd chain from the hook SC/DC, SC/DC13, SK1, SC4, SL. Fasten off.
R2: Turn work. in the last SC/DC of the previous round attach yarn with either a SL, CH1 and SC/DC or a standing SC/DC. SC/DC13. CH1 and turn.
R3: 2SC/DC, CH4, SL in 2nd chain from hook, 2SC/DC, SL in the next stitch along from round 2, [CH5, in 2nd chain from hook SL, 4SC/DC, SL into the next stitch along from round 2] Repeat a total of five times, CH6, SL in 2nd chain from the hook, 4SC/DC, SL into the side of the first stitch of R2 (side bar of the standing SC/DC or the CH1). Fasten off and weave in ends.
Step 3: Assemble


- Align the ends of each wing. Sew together.
- Sew the yellow circle to the middle tab of the wings.
- Sew button at the end of each wing just before the “feather” ends.

Broom:
Step 1: Make Fringe
Fringe: [F] CH7, in 2nd chain from hook SL. SL in the next 5 stitches.
R1: CH5, in 1st chain from the hook SC/DC, SC/DC across. Ch1 and turn. [4]
R2: SC/DC across, CH1 and turn. [4]
R3: 2SC/DC in first stitch, SC//DC, SC/DC, 2SC/DC in same stitch, CH1 and turn. [6]
R4: This row we make a fringe. In the first stitch make 3F, in the 2nd stitch make 2F, in the third stitch make 2F, in the fourth stitch make 2F, 2F in the fifth stitch, 3F in the 6th stitch, Fasten off and leave a long tail to fasten off.
Step 2: Make Broom handle
This component sets the variable length for the ear saver. You start with a base chain. This chain should be just longer then the desired length. This pattern is written for a length of 4.5”/12cm between the buttons.
Foundation: Chain 28 stitches.
R1: In the 2nd chain from the hook SC/DC, SC/DC to the last stitch. Make 3SC/DC in the last stitch. Working back along the other side of the foundation chain SC/DC in each stitch. Fasten off and weave in ends.
Step 3: Assemble
- Wrap the first three rows of the fringe section around the non-rounded end of the broom handle. The fringe base should over lap at the back. Secure to the broom handle and sew button to the right side.
- Chain 10 with the dark brown. Fasten off and sew around the base of the fringe.
- Sew button 4 stitches from the end of the broom stick.
Scarf:
The scarf is easy to vary the ear saver length for. This pattern has been written for a button spacing of 4.5”/12cm. To increase or decrease change the length of the foundation stitch. Maintain the pattern across.
This also uses the invisible colour change technique. To do this you swap the final yarn over of the previous stitch with the new colour. Carry the contrasting colour through the entirety of each row to assist with the fringe at the end.
 |  |  |
| Start Stitch before colour change as usual. | Before completing stitch yarn over with the alternate colour. | Complete stitch to finish the colour change. |
 |
| Working around the carried contrasting colour |
This scarf is worked in rows with the right side only. At the end of each row end off and cut the yarn leaving a tail that can be trimmed to the desired fringe length.
For ease of reading the rows are written using A and B to represent main colour (A) and contrasting colour (B). The stitches throughout are SC in US terminology, or DC in UK terminology.
Step 1: Scarf Body
Foundation: Chain 25.
remember to work around the contrasting colour, and change colour at the end of the previous stitch. I recommend starting each row with a standing SC/DC, If you are not familiar with this stitch. Pull a loop through the first stitch, Chain 1 and SC/DC in the same stitch.
R1: 3A, B, *5A, B,* Repeat until the end of the row. Fasten off and weave in ends.
R2-3: Repeat round 1.
R4: In colour A only, SL in each stitch across.
Step 2: Build Fringe
- Using the ends from each colour trim the ends to around 2cm length, or your desired length.
- If you would like more strands to the fringe add more strands.
Step 3: Sew Buttons
Buttons should be sewn in between the 2nd and 3rd stitch from the end of each end.

Contribution for future articles
If you would like to support future patterns and projects please consider donating or contributing through paypal. I have set this up as a $2AUD contribution. I really apprciate your support.
A$2.00
Terms of use:
Free patterns found on this site can be used to make finished items for the following purposes:
- For personal use
- As gifts for friends/family
- For charity donations
- For sale online
- For sale at craft fairs, outdoor markets, etc.
When using the free patterns found on this site, please be aware of the following:
- You are allowed sell finished items from the patterns found here. However, you may NOT, under any circumstances, use the photos found on this site for selling your items. If you are going to sell online, you should make your own items and photograph them to represent your own work.
- You may NOT copy and paste the pattern onto your own blog, Facebook, or anywhere else. If you would like to share a pattern, simply share the link to the page instead. You are welcome to copy and paste a pattern into a document for printing or saving for personal use only.
- You may NOT use the free patterns found on this site as teaching material and/or for online classes without expressed written consent from the designer/owner of this page.
- You may NOT use the free patterns found on this site to create video tutorials on YouTube or any other video platform, site, or blog.
- You may NOT post a translation of the patterns found on this site anywhere without expressed written consent from the designer/owner of this page.
- You may NOT create PDFs of the patterns found on this site, altered or in its original form, for intent to distribute to others or post on illegal pattern sharing sites. The revenue earned by ad traffic to this site is what allows for free patterns to be written and published. Without people visiting this site to view the patterns, there will be no traffic which means, no more free patterns.
- You may NOT copy any of the free patterns on this site, in part or as a whole, and claim them as your own pattern.
- You may NOT resell the free patterns found on this site, altered or in its original form.
If you have any questions regarding the terms of use of this page, please contact the designer/site owner.
