There are so many wonderful colourways available in hand dyed yarns. One of my absolute favourite stores is Stitchcraft & Wizardry. I love their mixes of colours, and the fun names as well. Being the curious person I am I started reading into the various ways to hand dye yarn. It turns out there are so many ways to dye yarn, but I have decided to write up the “entry” level method. You can do this method with kitchen appliances and you wont need to worry about any chemicals because there are none.

What will you need?
- Yarn of your choice. Thereare some specifics I will discuss below.
- Vinegar
- Food Dye
- Droppers
- Paper towel
- fork
- Saucepan and steamer arrangement
- bowl
- dishwashing detergent
Yarn Selection and Preperation
This is the part of the decision process which determines the overall success of your dye process. Synthetic yarns will not dye using this method and require chemicals alternate methods. Natural fibres like wool and cotton dye well. You can use a mix of natural and synthetics. Typically over 60% wool will help with the success. The less natural fibres in the yarn, the plaer the results will be. For example a bold red in 100%merino will appear a pastel pink ina 40% wool 20% nylon mix. I would recomend 70% wool or more. I have liked the results I have acheived using the lincraft Grasslands yarn (100% wool) from this tutorial or the undyed hanks from bendigo woolen mills (80%wool, 20% nylon).
Preparing the yarn is the first key step in the dyeing process. Most yarn you will purchase from your local craft store (Lincraft or Spotlight) will not be in a hank. What is a hank you ask?

Who knew there were that many ways to wind up yarn? Rather then repeating information that is readily available, I suggest checking out interweve’s article on the types of yarn balls. Most of the yarn I purchase comes in a donut or bullet skein. However,you can easily make your own hank from these with nothing but two chairs. The grasslands yarn I used comes in a bullet skien, and I wound it into a hank. didnt document this process but youtube is a wonderful resource. I recomend you follow this process:
So now we have a hank of yarn. Before we can do anything more we need to prepare the wook. To make sure the dye sets in the wool we need to soak it in an acidic soloution. The easiest way to do this is to use vinegar. To make the soloution fill up a bowl with enough water to cover the yarn. Add 4 tablespoons of vinegar to the soloution. You can add more but I have found 4 works well. Soak yarn in the soloution for at least half an hour.
Dyes
To prepare your dye you need to have some small glasses and a good idea of how much yarn you are dyeing. It will be difficult to exactly replicate the exact colouring on another mix. The dyes will need to be diluted for this process, roughly the ratio to use is 10 drops of dye (if using liquid food dye) to 1/8 cup of water. If you want a lighter colour you can use less drops of dye.
If you are not using liquid dye that is ok, I have used both powder and gel dye as well. If using powered You will need to follow your dye packets instructions to make a paste which you will then add to the water. Gel can be added straight to the water.
I usually dye two hanks at a time and only need a half cup total of dyes to get the effect I am looking for. To get your colours, mix the food dyes until you are happy. The easiest way to see how the colour will turn out in your yarn, dip a fork into the dye and then press it into some paper towel. The result on the paper towel is very close to what the wool will look like. Make sure you have prepared enough dye. It is better to have too much then not enough!
If your colours look too bright you can always mix up some black or brown and add a few drops of the dye solution to dull the colour.
Dyeing your Yarn
After all that preparation work has been completed, and your yarn has soaked for half an hour, you can finally get into the dyeing process.
The first task is to carefully squeeze the vinegar solution from the yarn. You do NOT want to wring out the water as this will cause your yarn to felt. instead gently squeeze the yarn. the more water you get out the less the colours will spread. This is a good thing if you are chasing a speckled look. Once the water is removed lay the hank out on a surface. I recommend coating the surface with cling-wrap first to make sure that you don’t dye your working surface as well!
Next we add the dye! this is the creative part. There are a few ways to approach this:
Solid Colours:
To achieve solid colours as shown here you need to make sure enough dye is applied to the yarn. Use the droppers to add dye to the yarn. once you have added dye to the yarn you need to make sure it has soaked in. To do this press lightly on the dye into the yarn to ensure it spreads.
Pick up the hank and turn over to make sure all the yarn ha been dyed. If not add more dye and repeat the process.
Speckled:
This is a similar process to the solid colour. Use the dropper to create a splatter pattern. You can also ‘flick’ the dye across the hank, but this may prove messy. Do not press down on the yarn. To make sure all the yarn in your hank is dyed you will have to rotate and the hank a few times until you are happy with the pattern.
When you are happy with the dye pattern you need to steam the yarn. Using a steamer, steam the yarn for at least 30 minutes. Turn off the heat and leave the lid on, allowing the yarn to cool.
Once the yarn is cooled wash the yarn in cold water. Be careful not to agitate it as the yarn will felt. Some colour will run from the yarn. Once water runs clear add some detergent and repeat.
Lay yarn out until dry. Wind hank into your preferred yarn skein and you are done!

Yarn soaking in vinegar solution 
Equipment Arrangement 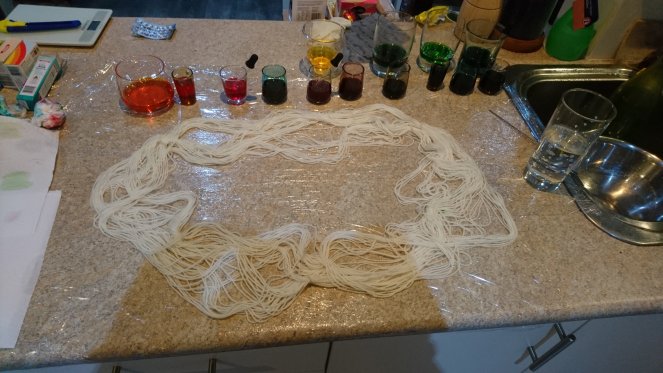
Hank laid out ready for dye 
Dyed yarn 
Before Steaming 
After Steaming 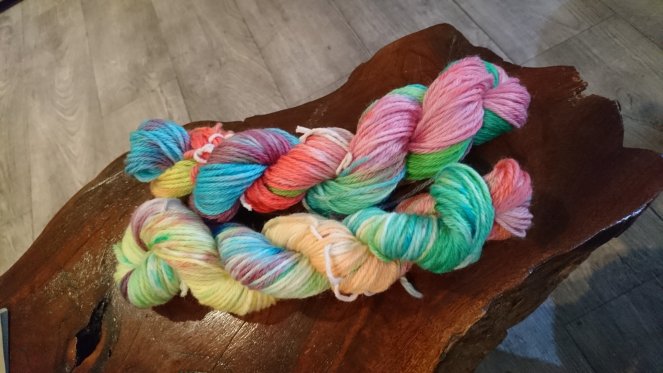
Finished product!
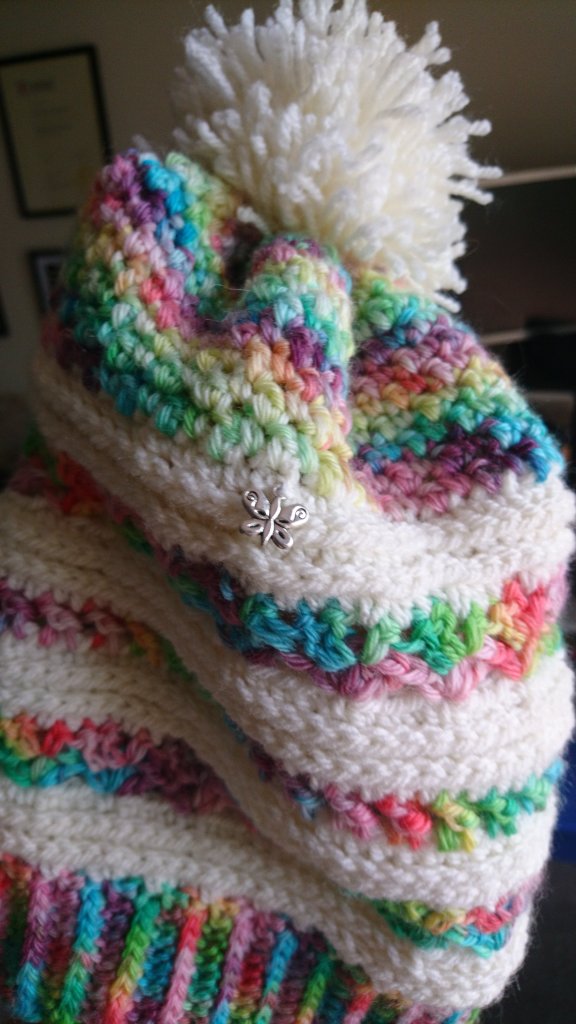
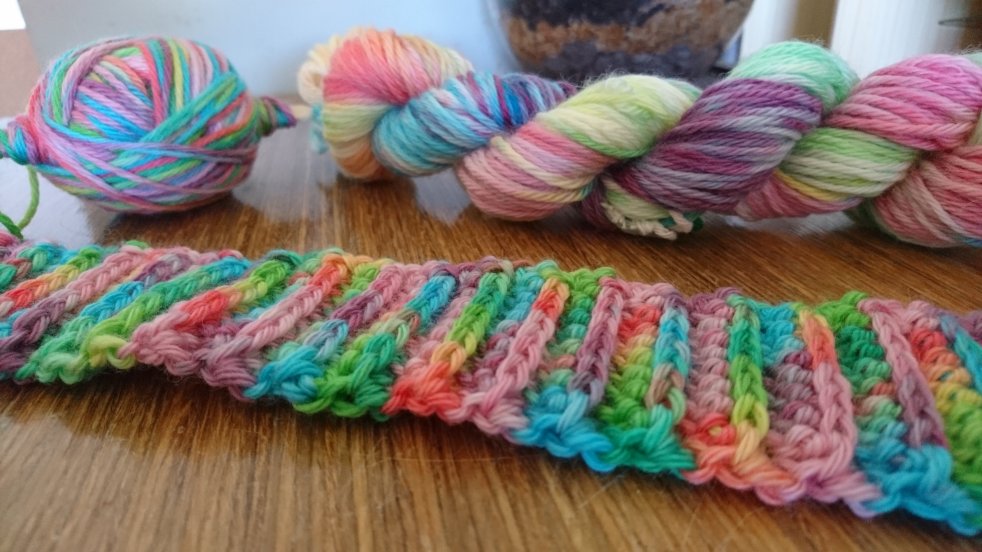
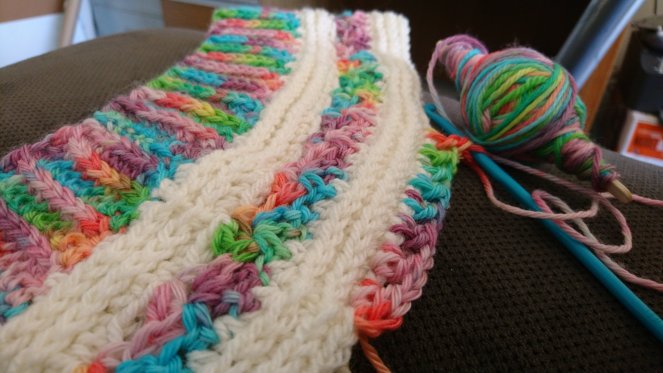
I hope you have as much fun dyeing yarn as I have. It allows you to make very unique yarn gifts. I have added a few images of my yarn projects using the yarn from the tutorial!